
Ridgeway by Kelty Tent Assembly Instructions: A Comprehensive Guide

Embark on seamless outdoor adventures! This guide delivers detailed, step-by-step instructions for effortlessly assembling your Ridgeway by Kelty tent, ensuring a stress-free camping setup․
Understanding Your Ridgeway by Kelty Tent Components
Familiarizing yourself with each part is key to a smooth setup․ Your Ridgeway by Kelty tent package includes several essential components, each playing a vital role in creating a secure and comfortable shelter․ These typically encompass the tent body itself – constructed from durable, weather-resistant fabric – and a complementary footprint designed to protect the tent floor from abrasion and moisture․
Crucially, you’ll find a set of tent poles, often color-coded for easy identification and connected at flexible joints to facilitate assembly․ Don’t overlook the guyline cords, essential for stabilizing the tent in windy conditions, and the tent stakes, used to anchor the tent securely to the ground․ Depending on the model, a rainfly is included, providing an extra layer of waterproof protection․
Understanding the function of each component – from the pole sleeves on the tent body to the buckles and clips that connect everything together – will significantly streamline the assembly process and ensure a successful camping experience․ Refer to the included Kelty manual for detailed diagrams and specific component lists for your particular Ridgeway model․
Unpacking and Inventory: Ensuring All Parts Are Present
Before venturing into assembly, a thorough unpacking and inventory are paramount․ Carefully remove all components from the tent package and lay them out in a clear, spacious area․ This allows for a comprehensive visual check, preventing frustrating discoveries mid-setup․ Begin by verifying the presence of the tent body, rainfly, and footprint․
Next, confirm you have the complete set of tent poles, paying attention to the number and color-coding (if applicable)․ Count the guyline cords and tent stakes – quantities vary by model, so consult your Kelty manual for specifics․ Ensure all buckles, clips, and zippers appear intact and functional․
Cross-reference your physical inventory with the parts list provided in the Kelty manual or on the product packaging․ Addressing any missing components before heading to the campsite will save considerable time and potential disappointment․ A complete inventory guarantees a smooth and enjoyable tent assembly process, setting the stage for a relaxing outdoor experience․

Preparing the Campsite: Selecting a Suitable Location
Choosing the right campsite is crucial for a comfortable and safe camping experience․ Prioritize a level surface, free from rocks, roots, and other debris that could damage the tent floor or impede sleep․ Gently slope the ground slightly to facilitate water runoff in case of rain – avoiding low-lying areas prone to pooling is essential;
Consider the surrounding environment; seek a spot sheltered from prevailing winds, utilizing natural features like trees or bushes for protection․ Be mindful of potential hazards such as falling branches or unstable slopes․ Ensure you are a safe distance from any fire pits or cooking areas to prevent accidental damage․

Check for local regulations regarding campsite selection and environmental impact․ Clear the chosen area of any loose materials before laying down the tent footprint․ Proper campsite preparation minimizes discomfort, maximizes safety, and contributes to responsible outdoor practices, enhancing your overall enjoyment of the Ridgeway by Kelty tent․
Step 1: Laying Out the Tent Footprint
Begin the assembly process by carefully laying out the tent footprint․ This protective layer, typically made of durable polyethylene, safeguards the tent floor from abrasion, punctures, and moisture․ Unfold the footprint and position it on the prepared campsite, ensuring it aligns with the intended tent placement․
The footprint should be slightly smaller than the tent’s floor dimensions to prevent rainwater from collecting underneath․ Smooth out any wrinkles or creases to create a flat, even surface․ If your Ridgeway by Kelty tent model includes corner grommets, align the footprint’s corresponding points accordingly․
Proper footprint placement is vital for extending the lifespan of your tent and maintaining a dry, comfortable interior․ Ensure the footprint is fully within the boundaries of your chosen campsite, avoiding any overlap with surrounding vegetation or uneven terrain․ This foundational step sets the stage for a successful tent setup․
Step 2: Assembling the Tent Poles
Next, assemble the tent poles, a crucial step for establishing the tent’s structural integrity․ Most Ridgeway by Kelty tents utilize shock-corded poles, meaning the sections are pre-connected by elastic cords for simplified assembly․ Carefully remove the pole sections from their sleeves or storage bag․
Begin by connecting the pole sections end-to-end, ensuring each segment clicks securely into place․ Avoid forcing the connections; a gentle twisting motion often helps․ Verify the shock cord runs smoothly through the entire pole length, without any kinks or obstructions․

Typically, different colored poles correspond to specific tent sections – consult your tent’s diagram if unsure․ Once assembled, lay the poles out in a straight line, ready for attachment to the tent body․ Proper pole assembly ensures a stable and reliable tent structure, capable of withstanding wind and weather․
Step 3: Attaching the Tent Poles to the Tent Body
With the poles assembled, it’s time to connect them to the tent body․ Locate the pole sleeves or clips on the tent’s exterior․ These are designed to accommodate the assembled poles, providing the initial framework for the tent structure․

Starting with one pole, carefully slide it through the corresponding sleeve, or attach it to the clips․ Gentle pressure may be needed, but avoid forcing it․ Repeat this process for all remaining poles, ensuring each is securely connected to the tent body․
Pay attention to the pole orientation; some tents require specific poles for certain positions․ Once all poles are in place, the tent will begin to take shape․ This step is fundamental to creating a stable and weatherproof shelter․ Double-check all connections to ensure they are firm and secure before proceeding․
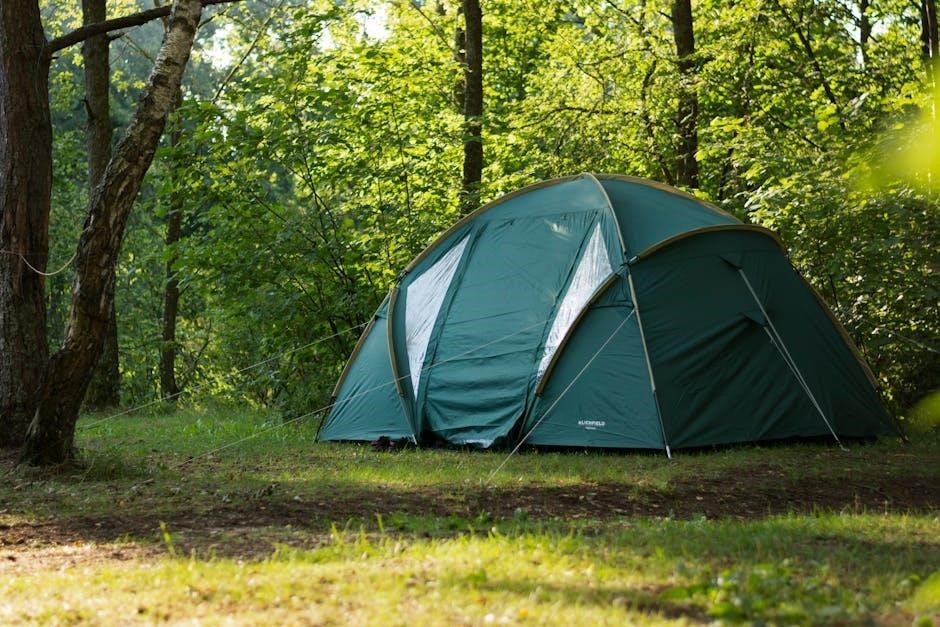
Step 4: Raising the Tent Structure
Now that the poles are connected, it’s time to raise the tent into its full upright position․ Begin by gently lifting the tent body, allowing the poles to flex and create the tent’s dome shape․ This may require a bit of coordination, especially with larger tents․

As you lift, ensure the poles remain securely seated in their sleeves or clips․ If any pole seems to be slipping, carefully readjust it before continuing․ Once the tent is mostly upright, inspect the overall structure for stability․
Look for any areas that appear uneven or unsupported․ A properly raised tent should have a symmetrical and taut shape․ This step is crucial for ensuring the tent can withstand wind and other environmental factors․ Take a moment to confirm everything looks correct before moving on to securing it․
Step 5: Securing the Tent with Stakes
With the tent structure raised, securing it to the ground is paramount for stability and weather resistance․ Locate the stake loops around the base of the tent․ These are reinforced points designed to accommodate tent stakes․
Insert a stake through each loop, angling it approximately 45 degrees away from the tent․ Drive the stakes firmly into the ground, leaving a small portion exposed for easy removal later․ Ensure the stakes are fully embedded to provide a secure hold․
Pull the tent fabric taut as you stake each loop, eliminating any slack․ This creates a streamlined profile that minimizes wind resistance․ For optimal security, especially in windy conditions, consider using additional stakes at strategic points around the tent perimeter․ Regularly check stake placement during your camping trip․
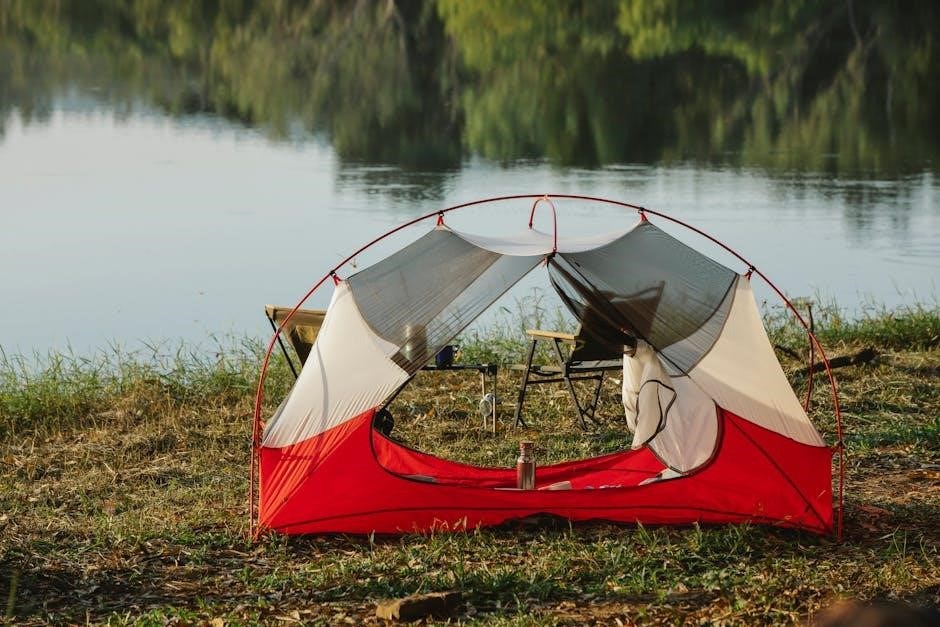
Step 6: Attaching the Rainfly
Protect your camping haven from the elements by correctly attaching the rainfly․ Begin by unfolding the rainfly and orienting it to match the tent’s shape․ Locate the attachment points – typically clips, buckles, or Velcro straps – on both the rainfly and the tent․

Carefully connect the rainfly to the tent, ensuring a snug fit․ Start with the corners, securing them first, then move along the sides․ Pay attention to any designated orientation markings on the rainfly․ Proper alignment is crucial for effective waterproofing․
Once attached, ensure the rainfly drapes evenly over the tent, creating an airspace for ventilation․ This helps minimize condensation buildup inside the tent․ Adjust the rainfly’s tension to prevent sagging or flapping in the wind, maximizing its protective capabilities․
Step 7: Guyline Attachment and Adjustment
Enhance your tent’s stability and weather resistance with properly attached and adjusted guylines․ Locate the guyline attachment points on the rainfly – these are typically loops or webbing reinforced areas․ Thread the guyline cords through these points, creating secure loops․
Stake the guylines out at a 45-degree angle from the tent, ensuring even tension․ This creates a broader base of support, resisting wind and preventing the tent from collapsing․ Avoid staking guylines directly upwards, as this reduces their effectiveness․
Adjust the tension on each guyline using the tensioners or knots․ Aim for a taut, but not overly tight, pitch․ Over-tightening can stress the tent fabric and poles․ Regularly check and readjust guylines, especially during changing weather conditions, to maintain optimal stability and protection․
Troubleshooting Common Assembly Issues
Encountering difficulties? Here’s how to address typical Ridgeway by Kelty tent assembly challenges․ If poles are difficult to connect, ensure they are aligned correctly and apply gentle pressure – avoid forcing them․ Check for any obstructions within the pole sleeves․
For a sagging tent structure, re-evaluate guyline tension․ Uneven tension or loose guylines are common culprits․ Also, confirm the tent footprint is flat and free of debris․ If the rainfly doesn’t fit snugly, double-check that the tent body is fully erected and all pole connections are secure․
Missing parts? Review your inventory list carefully․ Contact Kelty support (see ‘Resources’ section) for replacements․ Remember, proper setup is crucial for weather resistance; address any issues before inclement weather arrives․ Don’t hesitate to consult the Kelty manual for detailed diagrams and solutions․
Tent Maintenance and Cleaning
Prolong your Ridgeway by Kelty tent’s lifespan with proper care! After each use, thoroughly dry the tent body and rainfly to prevent mildew․ Remove any dirt or debris with a soft brush or damp cloth․ Avoid harsh detergents or abrasive cleaners, as these can damage the tent’s coating․
For stubborn stains, use a mild soap solution specifically designed for outdoor gear․ Inspect seams regularly for wear and tear; repair any damage promptly with seam sealer․ Store the tent loosely rolled, not tightly packed, to avoid stressing the fabric and poles․
Periodically re-waterproof the rainfly, especially after extended use or exposure to heavy rain․ Kelty offers recommended waterproofing treatments․ Proper maintenance ensures your tent remains a reliable shelter for many camping adventures to come, safeguarding your investment and comfort․
Storage Guidelines for Longevity
Maximize your Ridgeway by Kelty tent’s durability with correct storage practices! Before long-term storage, ensure the tent is completely dry – this is crucial to prevent mildew and fabric degradation․ Avoid storing in direct sunlight or humid environments, as UV rays and moisture can compromise the materials․
Loosely roll, rather than tightly pack, the tent body and rainfly․ This prevents creasing and stress on the fabric․ Store poles separately in their designated sleeves or bags․ Keep all components – tent, rainfly, poles, stakes, and guy lines – together in the provided carry bag, but avoid overstuffing․
Choose a cool, dry, and well-ventilated storage location, such as a closet or garage․ Regularly check the stored tent for any signs of damage or mildew․ Following these guidelines will ensure your tent remains in optimal condition for years of enjoyable camping experiences․
Understanding Different Ridgeway by Kelty Models (4-Person, 10-Person etc․)
The Ridgeway by Kelty tent series caters to diverse camping needs, offering various sizes like 4-person and 10-person models․ While the fundamental assembly process remains consistent across models, key differences exist in pole configurations and tent dimensions․
Larger tents, such as the 10-person version, typically feature more poles and a more complex pole structure to provide enhanced stability and spaciousness․ The 4-person model is simpler, with fewer poles and a more compact design, ideal for backpacking or smaller groups․
Always refer to the specific instructions included with your particular Ridgeway model․ Pay close attention to pole labeling and connection points․ Understanding these variations ensures a correct and secure setup, maximizing your camping comfort․ Familiarize yourself with the unique features of your tent size before heading outdoors!
Safety Precautions During Assembly and Use
Prioritize safety during Ridgeway by Kelty tent assembly and throughout your camping trip․ Always assemble the tent on a level surface, clear of rocks and sharp objects, to prevent damage and ensure stability․
Exercise caution when handling tent poles, as they can spring open with force․ Avoid pitching your tent under hazardous trees or during severe weather conditions like thunderstorms or high winds․ Secure the tent properly with stakes and guylines to withstand potential gusts․
Never use open flames inside the tent․ Ensure adequate ventilation to prevent carbon monoxide buildup if using a stove or heater․ Be mindful of your surroundings and wildlife․ Store food properly to avoid attracting animals․ Regularly inspect the tent for any damage and address it promptly․
Resources: Kelty Manuals and Support
For comprehensive assistance with your Ridgeway by Kelty tent, Kelty provides a wealth of resources․ Access detailed user manuals, service guides, and operating instructions directly from the Kelty website․ These documents cover setup, maintenance, troubleshooting, and specifications for various models, including the 4-person and 10-person versions․
You can find downloadable PDF manuals for your specific tent model, offering visual aids and step-by-step guidance․ Kelty’s support team is also available to answer your questions and address any concerns you may have regarding assembly or usage․
Explore their online FAQs and knowledge base for quick solutions to common issues․ Additionally, numerous online communities and forums dedicated to camping and outdoor gear offer valuable tips and shared experiences from fellow Ridgeway by Kelty tent owners․ Don’t hesitate to utilize these resources for a seamless camping experience!